The “Active File”
The active file is one of the user created data files where labels are stored. This file is a Microsoft Visual FoxPro table composed of a file ending with the *.plw extension and another ending with *.fpt (e.g., MyPlabelFile.plw, MyPlabelFile.fpt). These two files are critical if you want to copy your PLabel data to another computer. Other files created to store various accompanying data include:
*.cdx – e.g. MyPlabelFile.cdx – an index file of the plabel data used to navigate by various file orders. This file will be recreated if missing. If this file is not kept in sync with your current PLabel data file it will appear that records are missing.
*.mem – e.g. MyPlabelFile.mem – remembers the data entered on the “add label” screen between sessions.
*.plwtemplate – e.g. MyPlabelFile.plwtemplate – remembers the data entered in the “template” screen between sessions.
The structure of the *.plw file is shown on the table structures page.
When the program loads there is no active file. You will be offered a file selection box when you select any option in the main menu if a file is required. Once a file has been selected in a session it becomes the “active file”. Add/edit/print menus will default to the active file. To change the active file, click on the “ACTIVE FILE” button on the main menu screen. Select a file and navigate directories as in most MS-Windows programs.![]()
 To create a new file, choose “New” from the file selection window. The file will be created in the directory you are in, so be sure you are in the directory where you want the file. Enter a file name in the blue/green box.
IMPORTANT! – you must copy both the *.plw and *.fpt file when you copy your data files. PLabel for Windows, or any other database using these files, will not open a *.plw file alone.
Main Menu
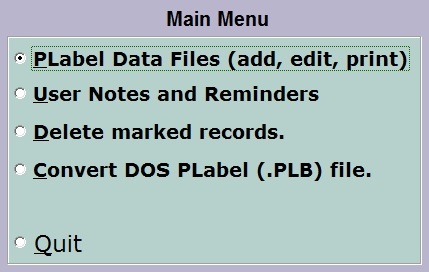
The Main Menu is the central navigation window of PLabel. Highlight the option you want to select with the up/down arrow and by clicking on it. Double-click anywhere in the menu box or press enter to select the item.
Add / Edit / Print PLabel Files
![]()
The add/edit/print window is the PLabel Main Window. There are seven pages in this window.
- Labels File Browse – includes a combination of a browse and edit navigation for the label file.
- Labels File Edit – full screen edit for each label. Here are useful keys and buttons–
Navigation Keys PgUp and PgDn Navigates between the add label and the template label. The template label stores information that you can carry over from label to label when the “template” button is set to on. Enter or Tab Moves you from field to field. Right-click on field label (words above field box), e.g., such as “Genus” (except FamC.) Greys and disables a field. Information remains stored in the field but when moving through fields the field is skipped. This helps you navigate faster. Select, Cut, Paste Keys Ctrl-A Highlight field. Ctrl-C Copy selected text. Ctrl-N Duplicates the information into the current record from the same field of the next record in the current file order. Ctrl-P Duplicates the information into the current record from the same field of the previous record in the current file order. Ctrl-V Paste selected text. F4 Provides a pick list for families if in the family code field or taxa if in any of the scientific name fields. The closest match to information entered in the fields will be brought up. Alphabetic letters in the family code field will allow for a search for family name in the families file. To pull in the information from the pop-up window choose the menu button or shift-F4. To return without retrieving information choose the menu button or F4. ESC Undo changes to field. Buttons Clear this Entry Blanks all fields. If the template is on the add label will be populated with the template defaults. Copy from Main Duplicates all fields in the record active in the labels file edit page into the add or template record. Template On/Off Clicking toggles the template carry over on and off. Close Click to return to the main menu. Special Character Formatting Codes (Reserved Characters) ~ (tilde) Toggle font italics on and off. E.g., ~word~ will italicize “word.” ^ (caret) Toggle font underline on and off. E.g., ^word^ will underline “word.” Alt-0127 (hold alt and type 0127 on numeric pad) Toggle font bold on and off. - Add Label – labels to be added are entered in this screen. PgUp or PgDn toggle the add label screen with a Template Label screen. Information entered in the template label will carry over from label to label. Here are useful keys and buttons for these screens —
Navigation Keys PgUp and PgDn Toggle between the template label and the add label. Enter or Tab Moves you from field to field. Right-click on field label (words above field box), e.g., such as “Genus” (except FamC.) Greys and disables a field. Information remains stored in the field but when moving through fields the field is skipped. This helps you navigate faster. Select, Cut, Paste Keys Ctrl-A Highlight field. Ctrl-C Copy selected text. Ctrl-L Duplicates the locality information into the add or template record from the same field in the record active in the labels file edit page. Ctrl-M Duplicates the information into the add or template record from the same field in the record active in the labels file edit page. Ctrl-N Duplicates the information from the same field between the template or add records. Ctrl-P Duplicates the information into the add or template record from the same field in the previous record entered Ctrl-S Duplicates the scientific name information into the add or template record from the same field in the record active in the labels file edit page. Ctrl-V paste selected text. F4 Provides a pick list for families if in the family code field or taxa if in any of the scientific name fields. The closest match to information entered in the fields will be brought up. Alphabetic letters in the family code field will allow for a search for family name in the families file. To pull in the information from the pop-up window choose the menu button or shift-F4. To return without retrieving information choose the menu button or F4. ESC Undo changes to field. Buttons Search Not yet active. Use quick search field. Add Labels Adds a blank label. It is recommended that the add label page be used instead. Quick Search The file will be searched based on the current order for the closest match to information entered in the box. Order Click to change the file order: as entered, collno, collector, sciname, family, locality. Close Click to return to the main menu. Special Character Formatting Codes (Reserved Characters) ~ (tilde) Toggle font italics on and off. E.g., ~word~ will italicize “word.” ^ (caret) Toggle font underline on and off. E.g., ^word^ will underline “word.” Alt-0127 (hold alt and type 0127 on numeric pad) Toggle font bold on and off. - Taxa, Families, Countries pages – browse these files. To add click the “allow add” button. To change the order click the order button.
- Print – the page for printing labels. See below for more info.
Print Labels
PLabel for Windows is designed to print labels to a rich text file (*.rtf) which may be opened in MS-Word or many other word processors. In order to print to the rich text file the report name should be set to “richtext_file” in the print config. (see below). Other MS-Foxpro reports are included with the program, but those older report configurations will no longer render font kerning correctly due to Windows updates. However, the summary lists should still correctly. One can also export the file to tab delimited and load those files in another program to print.
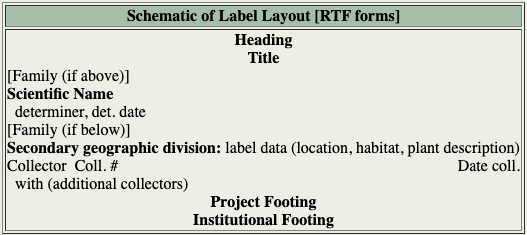
The print window is the far right tab on the PLabel Main Screen it includes the print settings. The following is an outline of the label layout.
The Print Window page has seven panels for control of print features.
- Print Criteria: the settings in this panel define which labels will be printed and the order.
- File order is set by clicking the grey button. It will toggle from “as entered” through the other available file orders.
- Criteria fields are:
- Proof code: print only labels with this character in the proofed field.
- Rec. # from/to: print labels with record numbers from/to. Labels are sequentially numbered as they are entered in the file. This field is the default print criteria setting for all labels in the file to be printed.
- Collection # from/to: print labels with collection numbers from/to.
- Collector first/last: print labels that have the collector name entered.
- Print Config.: contains controls, formats and user defined labels for label design.

- Report name: Reports are stored in MS-Foxpro report format files (*.frx/*.frt). These files are stored in the \plwin\print\ directory. If you have MS-FoxPro you can use these as an example and create your own. A variety of summary outputs are available.The default report format is “richtext_file”. This is the standard PLabel print output which produces a rich text (.rtf) file. This report format allows for embedded character formating (bold, italic, underline). The additional fields in the print configuration control some of this RTF file output.
- Taxon
Style: N=normal, I=Italic, B=Bold, U=Underline
Epithet style (species, infra): N=normal, I=Italic, B=Bold, U=Underline
Wrap type: 1=wraps between any taxon word, 2=never wraps between epithet and authority, pushes entire rank1 and rank2 to new line. - Print Commons: common names will print when checked.
- Family prefix/suffix: family names are printed based on the family code matching in the families table. The prefix and suffix, if given, will delimit the name. E.g., [ and ] will print [Asteraceae].
- Family align: L=left justified, C=centered, R=Right justified
- Family position: A=print family above scientific name. B=print family below scientific name. The family will not print if anything else is entered.
- Common prefix: what prints in front of a single common name or multiple common names. Multiple common names must be separated by semi-colons to be recognized..
- Collr.
style: =font style: N=normal, I=Italic, B=Bold, U=Underline
prefix: what prints in front of the collector name (e.g. “coll.”)
#: what prints in front of the collection number
no coll. #: what prints when the collection number field is empty (e.g., “s.n.”)
with: what prints as prefix when there are additional collectors (e.g., “with”)
det.: what prints in front of the determiner (e.g., “det.”) - Origin pos.: C=print origin information after collector. Otherwise (any other letter), print origin information after habitat within the body of the label.
- Geo uncertainty: prefix printed in front of geouncertainty measurement.
- Project:
pos: T=top of label in title section, C=before notes, B=at bottom of label.
align: L=left justified, C=centered, R=Right justified
size: point size of font
style: =font style: N=normal, I=Italic, B=Bold, U=Underline
space bef.: units of space, in twips, above the project title. A twip is a twentieth of a point, i.e., a 1440th of an inch. This measure is chosen because it is the native measure used in RTF formatting.
space after: units of space, in twips, below the project title.
separator line width above/below: 0 for no line or a unit to designate the width of a line drawn under and or below the project title. - Notes:
font size: point size of font
sp. before: units of space, in twips, above the note text. A twip is a twentieth of a point, i.e., a 1440th of an inch. This measure is chosen because it is the native measure used in RTF formatting. - Field prsv.: This prints in the notes when the field preserved is checked.
- Add Material and Separator: control the format of the additional material collected statement. If the additional material fields are checked the Add. Material prefix will print. The separator will print between each of the additional material statements. E.g., Additional material collected: DNA; wood; spirit preserved – where “Additional material collected:” is in the Add Material field and “;” is the separator.
- DNA: prints when the DNA field is checked.
- Wood: prints when the wood field is checked.
- Photos: prints when the photo field is checked.
- Spirit: prints when the spirit field is checked.
- Living: prints when the living material field is checked.
- Headings print on the top each label. The headings are stored in a separate data file and can be selected with the navigation buttons in the panel. Double triangles go to the top or bottom of the file, single triangles more one entry at a time. The heading showing will be the one printed. A reserved entry to print no heading is at the beginning of the file.Heading formatting is controlled by entries in several fields:
- Align: L=left justified, C=centered, R=Right justified
- Size: point size of print.
- Style: N=normal, I=Italic, B=Bold, U=Underline
- Sp. after: units of space to leave between the heading and the next section of the label. Units are designated in twips. A twip is a twentieth of a point, i.e., a 1440th of an inch. This measure is chosen because it is the native measure used in RTF formatting. For more information see: Twips in the RTF Cookbook.
- Separator line below (width): 0 for no line or a unit to designate the width of a line drawn under the heading across the label.
- Distance from text: Distance below heading to draw the separator line.\
- Shading: percent shading of the heading, if desired.
- Titles: print below the heading at the top of each label. The titles are stored in a separate data file and can be selected with the navigation buttons in the panel. Double triangles go to the top or bottom of the file, single triangles more one entry at a time. Title fields are paired. The second (bottom) prints when the Cult? field is checked. This allows for titles such as “Plants of / Cultivated Plants of.” The title pair showing will be the ones printed. A reserved entry to print no title is at the beginning of the file.An asterisk in a title will substitute the primary geographic are name in place of the asterisk. This will be a state in the United States but country for foreign countries. If there is no asterisk here then the geographic information is bumped to the beginning of the location in the label.Title formatting is controlled by entries in several fields:
- Align: L=left justified, C=centered, R=Right justified
- Size: point size of print.
- Style: N=normal, I=Italic, B=Bold, U=Underline
- Sp. before / after: units of space to leave between the title and sections above (heading) and below. Measurement units are in twips.
- Project Footings: print at the bottom of each label above the institutional footing. The project footings are stored in a separate data file and can be selected with the navigation buttons in the panel. Double triangles go to the top or bottom of the file, single triangles more one entry at a time. The project footing showing will be the one printed. A reserved entry to print no project footing is at the beginning of the file.Project footing formatting is controlled by entries in several fields:
- Align: L=left justified, C=centered, R=Right justified
- Size: point size of print.
- Style: N=normal, I=Italic, B=Bold, U=Underline
- Before: units of space to leave before the project footing. Units are designated in twips. A twip is a twentieth of a point, i.e., a 1440th of an inch. This measure is chosen because it is the native measure used in RTF formatting. For more information see: Twips in the RTF Cookbook.
- After: units of space to leave after the project footing (in twips).
- Institutional (Inst.) Footings: print at the very bottom of each label. The institutional footings are stored in a separate data file and can be selected with the navigation buttons in the panel. Double triangles go to the top or bottom of the file, single triangles more one entry at a time. The institutional footing showing will be the one printed. A reserved entry to print no institutional footing is at the beginning of the file.Institutional footing formatting is controlled by entries in several fields:
- Align: L=left justified, C=centered, R=Right justified
- Size: point size of print.
- Style: N=normal, I=Italic, B=Bold, U=Underline
- Before: units of space to leave before the institutional footing. Units are designated in twips. A twip is a twentieth of a point, i.e., a 1440th of an inch. This measure is chosen because it is the native measure used in RTF formatting. For more information see: Twips in the RTF Cookbook.
- After: units of space to leave after the institutional footing (in twips).
- Separator line above (width): 0 for no line or a unit to designate the width of a line drawn above the institutional footing across the label.
- Distance from text: distance above institutional heading to draw the separator line.
Printing for Bryophyte and Lichen Packets
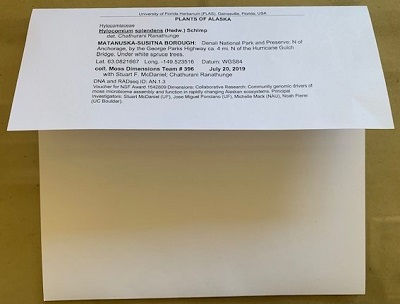
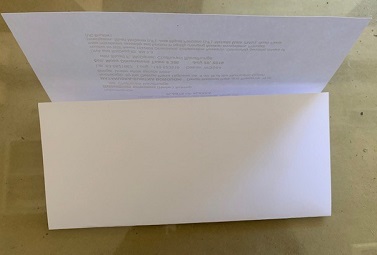
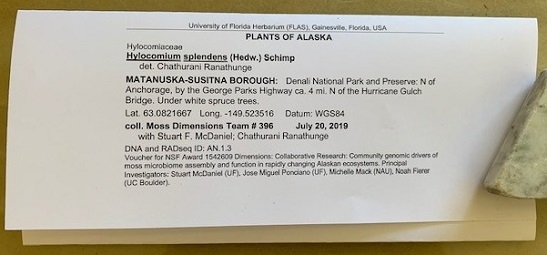
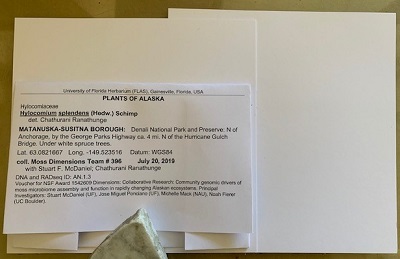
The UF Herbarium prepares bryophyte and lichen specimens in packets mounted on 5 3/4″ wide x 5 1/2″ high cards. Our North American Digitization project page includes more details and examples.
Labels may be printed with a laser printer directly on 28lb archival paper. The paper should have a smooth surface with laser printer specifications. The most recent paper we purchased was: Office Depot® Color Copy Pro 28 lb 98 brightness 8.5” x 11”. Item 335 992. It seems that it was rebranded as Office Depot® Brand Inkjet & Laser Paper. Any other brand of laser jet paper should be fine, as long as it is acid-free. The paper package often does not say the paper is acid-free, but the product description on the Web site may state that. To be sure, each package of paper should be tested with a pH test pen. Also, some samples should be printed and checked to make sure the ink fuses solidly to the page (rub it vigorously) and is waterproof (put it in water). Desk jet printers are generally not considered to be archival.
The following is the formatting to apply to a PLabel file and folding instructions:
- Print to a PLabel RTF file as usual.
- Change the output document from 2 to 1 column.
- Add a page break before each label. This is usually done with a search and replace of part of the University of Florida Herbarium header or the footer and adding a manual page break (^m).
Search for: University of Florida Herbarium
Replace with: ^mUniversity of Florida Herbarium - Set the margins to: Top: 7.7”, Bottom: 0.2”; Left: 1.7”, Right: 1.7”
- Print on a heavier weight paper. The following is the current paper we use:
Office Depot Color Copy Pro, 8 ½” X 11”, very bright white, 28 lb. (item 335-992) - The label should be printed at the center towards the bottom of the page.
- Folding instructions.
- This should make a packet about 5 3/8” wide x 3 13/16” high with a 3 7/8” label flap area. Of course, it can vary slightly, but just be sure it will fit on the cards FLAS will use.
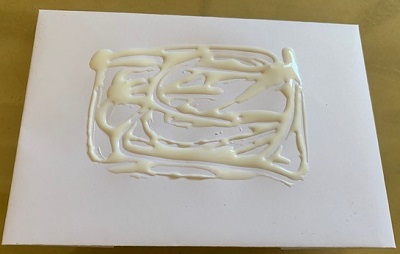
- Mounting the packet on a card:
Exporting PLabel Data
PLabel data files are stored in MS-Foxpro data file format. Details on the fields in the tables are available in the table structures Web page. To export data from PLabel follow these steps:
- Update to the latest version of PLabel. Version 2.8 and greater supports current MS-Excel export/import methods.
- Choose the PRINT tab for the Main Form (the form with the Add/Edit tabs).
- On the print screen fill in the print criteria in the top portion. To export the entire file leave the default which is the full record number range for the file.
- Choose the EXPORT TO FILE button at the bottom of the screen.
- Choose a FILE FORMAT for export:
PLabel format (*.plw) – The output file will be in Plabel format. This is a way to split off part of a file.
Tab-delimited (*.txt) – The header and each data line ends with a carriage return/line feed (chr(13)+chr(10). The first line contains the names of the fields separated with tabs. Each other line contains the field values separated with tabs. Please note that this data format does not use quotes to contain the data fields. I.e., this is not the comma-separated value format, .csv.
Summary tab-delimited text (*.txt) – This summary file is in the tab-delimited format with the following fields or pseudo-fields: Family, Taxon (combination of taxon related fields), Collector, Coll. #, Date Coll., Geography (combination of various geographic fields). This file is suitable for generating a summary list of collections in MS-Word or other program. - Click the CHOOSE FILE! button and enter a file name. The default folder is \plwin2\export\. You can navigate to another folder if you wish for your file to be in a different one.
- Click the EXPORT button to export to the file, or to cancel, click the CANCEL button.
To open the tab-delimited file in MS-Excel
- Choose the file from the File/Open menu of MS-Excel.
- The MS-Excel should open a text import wizard and indicate that it recognizes the file as: Delimited; Start import at row 1; File source: 437 : OEM United States.
- Select “NEXT”.
- Delimiters: “Tab” should be selected.
- Text qualifier: change from ” to “none”.
- Select “NEXT”.
- Column data format should be left as “General”.
- Select “FINISH”.
Editing and/or Preparing Plabel Compliant Data in an MS-Excel Spreadsheet
MS-Windows users are highly encouraged to use PLabel to generate labels. This program works seamlessly with our in-house database and includes some built-in error checking. If you are a Mac or Linux user, or feel you must use another program, the data structure must match the PLabel data structure. To set up a file in MS-Excel, please be mindful of the guidelines below.
- Set up a file with fields that match PLabel. A tab-delimited PLabel data header file is available (right-click to save) which will work as an MS-Excel (or other spreadsheet/database) template. Paste it at the top of your spreadsheet to serve as the column names. See the table structures Web page for more information about the field values and structure. You can also create a PLabel file and export it to tab-delimited and import it to MS-Excel.
- The following are important data entry guidelines:
- You may delete any fields you don’t use.
- You may add fields that you want for your own use, but they will not import to PLabel or print.
- Family and FamCode fields will be populated in PLabel based on the genus.
- Capitalize the start and punctuate at the end of the following fields:
locality, origin, habitat, pltdesc, note, project, permit. All other fields are automatically punctuated, so don’t add any punctuation. - There are options for printing the origin field, if it is used. This is described in the Plabel Quick Guide. By default origin is printed after habitat within the body of the label. If you prefer it to be printed after the collector, please let the Collection Manager know.
- Save the MS-Excel file: “Save As” – Text (tab-delimited) (*.txt.)
- The tab-delimited file can be imported into PLabel via the Import a File button on the Print screen. The Collection Manager will error-check the file and print labels.
Importing Data to a PLabel Data File
PLabel data files are stored in MS-Foxpro data file format. Details on the fields in the tables are available in the table structures web page. In order to import data to a PLabel file the data field names must match the data fields in an existing PLabel file. If you want to check the format of an existing Plabel file you can also export it to a tab-delimited file, *.txt, (see above) and then look at the header line for the field names. The following are recommended steps for importing a file.
- Update to the latest version of PLabel. Version 2.8 and greater supports current MS-Excel export/import methods.
- Important: due to the possiblity of errors in import file layout, it is best to import your data to a new temporary file first. Once that file is scrutinized and deemed ok you can merge it with an existing Plabel file via import.
- Open Plabel and create a new database file (Main Menu / Plabel Data Files (Add Edit Print) / NEW – give it a file name) OR (ACTIVE FILE / NEW – give it a file name).
- From the PRINT tab screen of PLabel, choose the “IMPORT A FILE” button.
- Choose the file format of your import file:
Plabel format (*.plw) – a Plabel file may be merged in to the end of an existing PLabel file.
Tab-delimited text (*.txt) – a tab-delimited file with the following format:
The header and each data line end with a carriage return/line feed (chr(13)+chr(10). The first line contains the names of the fields separated with tabs. These fields should match the PLabel fields. Fields that do not match the Plabel format will be ignored. The fields do not have to be in the same order as the order of the fields in a PLabel file. Each other line contains the field values (in same order as the fields line) separated with tabs. Individual fields may or may not be enclosed with quotes on both ends. This is the tab-delmiited (*.txt) format of MS-Excel. This is NOT the comma-separated value format, .csv. - Click the “CHOOSE FILE!” button and enter a file name. The default folder is \plwin2\export\. You can navigate to another folder if you wish for your file to be in a different one.
- Click the “IMPORT” button to import the file, or to cancel, click the CANCEL button.
Convert DOS (*.PLB) File
You can always go back to your original PLabel (DOS) *.plb file if something goes wrong with this conversion.
- Open or create a new PLabel for Windows file (*.plw).
- Choose the PLabel for DOS (*.plb) file to load in. It will merge the records from that file into the *.plw file.
Be sure to look over the converted records carefully. The most prone area for errors is in the conversion of the locality coordinates field into lat./long. and STR fields. If the program doesn’t understand the format the information is in it should dump the locality coordinates in the STR field.
Frequently asked questions.
- How do I delete records? The left column of the browse screen has a white box that toggles when clicked. Records set black are marked for deletion. To delete the records choose “Purge Records Marked for Deletion” from the main PLabel menu.
- Why won’t my heading/title/footing print? The first record of the heading/title and footing files is a dummy record that instructs the program to print nothing. The program comes with “*No Heading*” (etc.) in this record but it could be edited in all versions prior to 22 Nov 2004. This has caused confusion and is not set so the first record can not be edited.
- I get an error when I try to print labels. What’s wrong? Labels printing utilizes rich text format classes. These are typically already installed on MS-Windows computers. In some cases these are not correctly registered and the program can’t find them. A work-around solution is still being worked on.
