Protocols for Georeferencing the Specimens
The Symbiota bryophyte portal and lichen portal will be used to georeference the specimens. There is a flash tutorial on the Symbiota web site which provides a general description of how to use the georeferencing tools within the portals. The tutorial describes how to generally use batch georeferencing and data editing on the portal sites along with the GeoLocate Tool.
If you do not have editing rights in the portals and access to the specific collections you want to edit, contact the Collection Manager.
Georeferencing Workflow Overview
- Use the Batch Georeference Specimens link in the Data Editor Control Panel (selected from the Collection link on the Specimen Management page.
- Search for sets of specimens to be georeferenced in geographic sets such as state and/or county.
- Review the record data in the sets and clean up the label information, especially locality. Correct for typos, misspellings and extra spaces.
- Select a locality set and click the GeoLocate tool.
- Find the locality using various maps, Google searches and physical maps.
- Estimate to the uncertainty radius or error polygon. Use the error polygon sparingly.
- Save the coordinates to your application (from GeoLocate to the Georeferencing Tools page).
- Fill in the remarks and confidence fields on the Georeferencing Tools page.
- Choose Update Coordinates to finish the georeferencing process. This will update the coordinates for the records in the set.
Georeferencing and Data Editing Process
- Under the Specimen Management tab, select the collection that you are to be georeferencing (eg. FLAS, FTU, FTG, etc., different collections will appear depending on the project you have been assigned to work on).
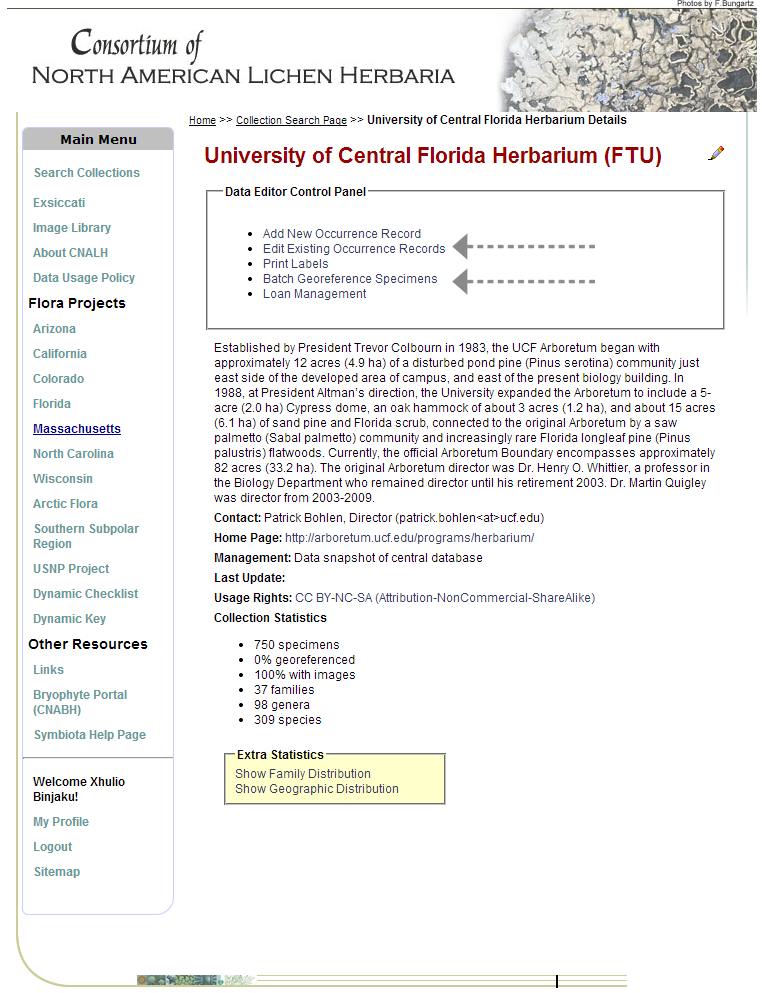
- After selecting a collection (we are using the University of Central Florida Herbarium (FTU) collection in this example), the Data Editor Control Panel displays options for editing records. For georeferencing we will be using the Edit Existing Occurrence Records and the Batch Georeference Specimens options.
How to Search and Edit Records for the GeoLocate Tool
- The first step to georeferencing records is to have understandable and accurate data for the GeoLocate Tool to read and infer the locality. Sometimes there are misspelling or formatting issues when a specimen is digitized, we have to fix these issues first so that we can get accurate data to be georeferenced. Use the guide on editing records for a general understanding on editing.
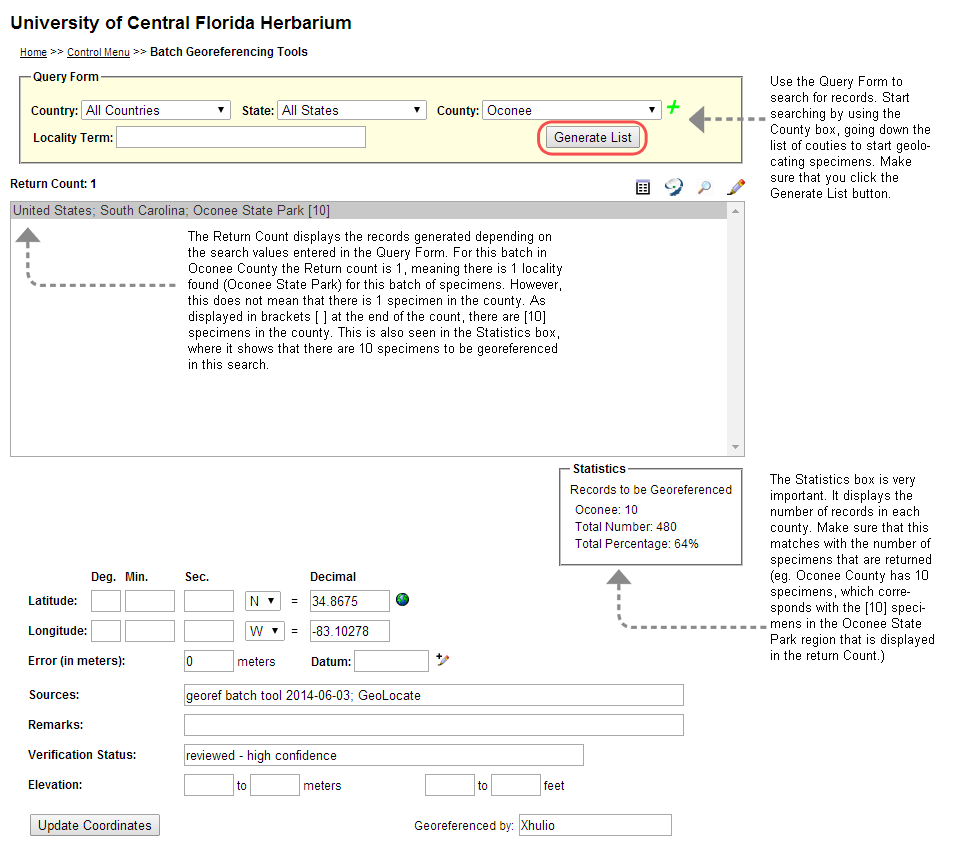
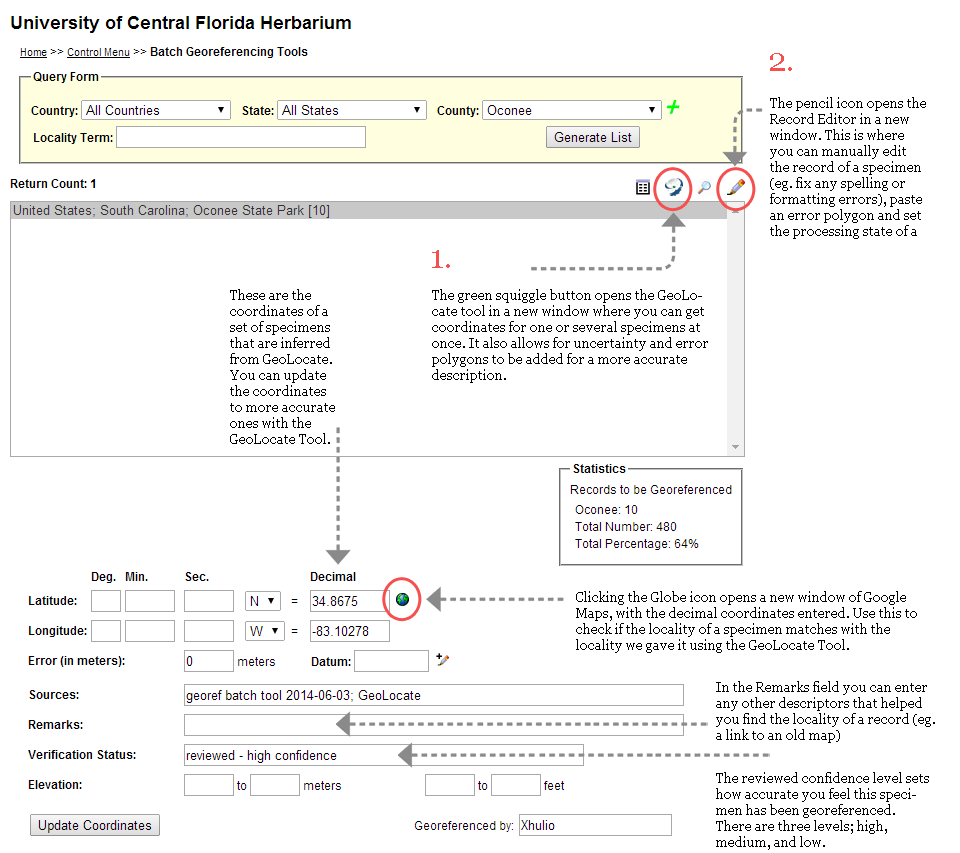
- On the Batch Georeferencing Tools page you can start searching for records to be edited and geolocated. Searching by county and going down the list is an easier way of keeping track of where you or your coworkers left off. It helps with finding the localities of several specimens since they are collected within one region that you can quickly become familiarized with.
Advanced Search using the Batch Georeference Tool
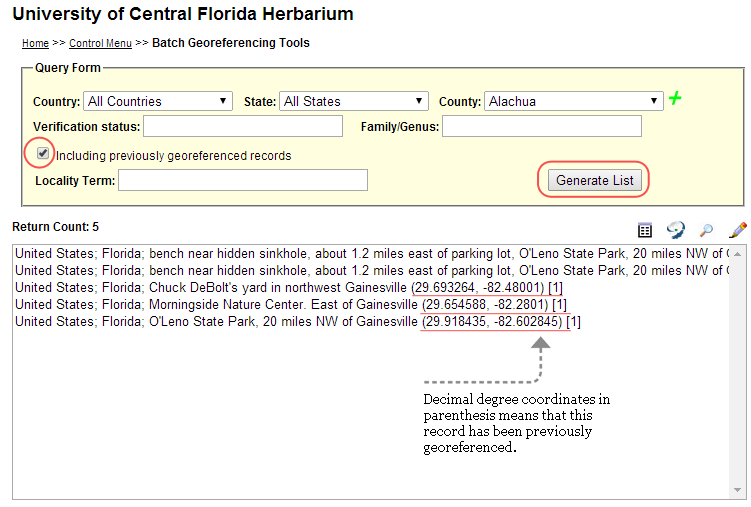
- To open the alternative search options choose the Green + sign to the right of the county field. This enables you to search by family/genus and to access previously georeferenced records. Normally the Query Form outputs records that have yet to be georeferenced.
- To see records that have already been georeferenced, check the Including previously georeferenced records box, and complete the search by completing any other fields such as County, and click Generate List.
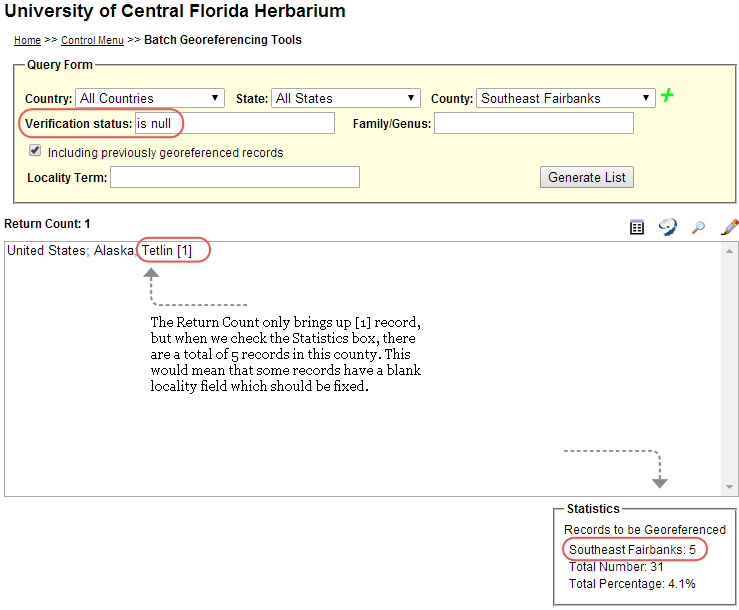
- Some records do not show up in the return count in Batch Georeference Tools. This a result of the way the tool searches for records as Batch Georeferencing Tools searches only for the Locality term. If there is nothing entered in the locality term it does not show up in the return counts. If label data does not have a locality, enter [N/A] in the locality field.
- As you are going through the list of counties use the Statistics box and the return counts to compare any discrepancies.
Cleaning Up/Editing Records on the Batch Georeference Tools Page
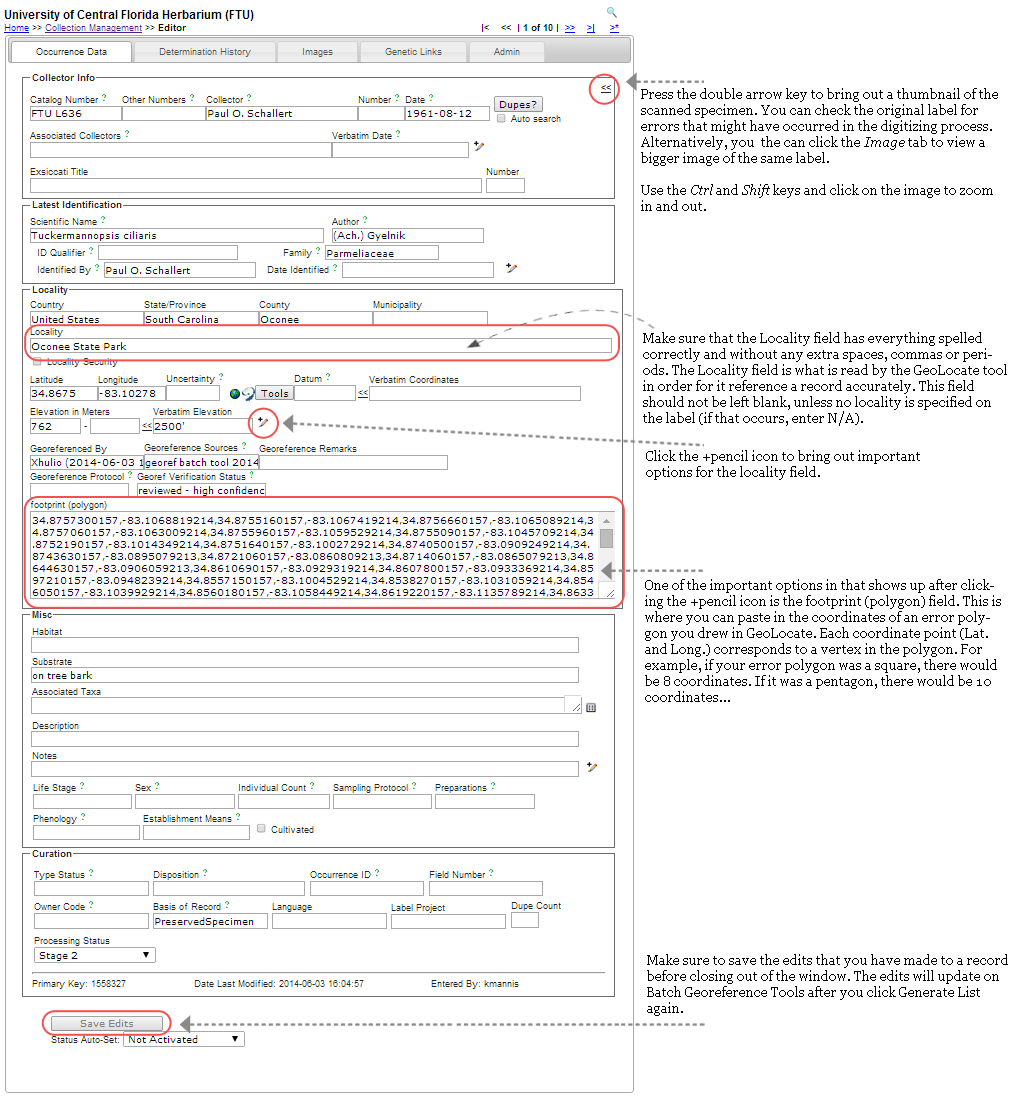
- To edit a record on the Batch Georeferencing Tools page, first highlight a record or set, then press the pencil icon to open the Occurrence Data Editor page in a new window.
- In the new window of the Occurrence Data Editor page you can edit misspellings and formatting errors.
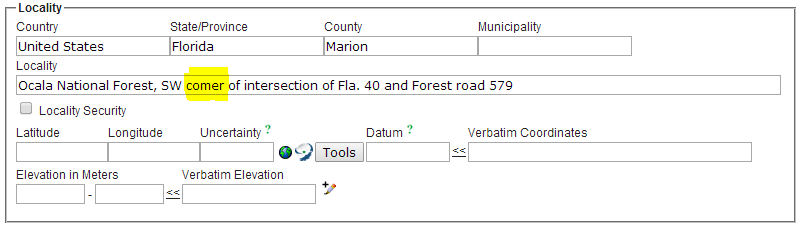
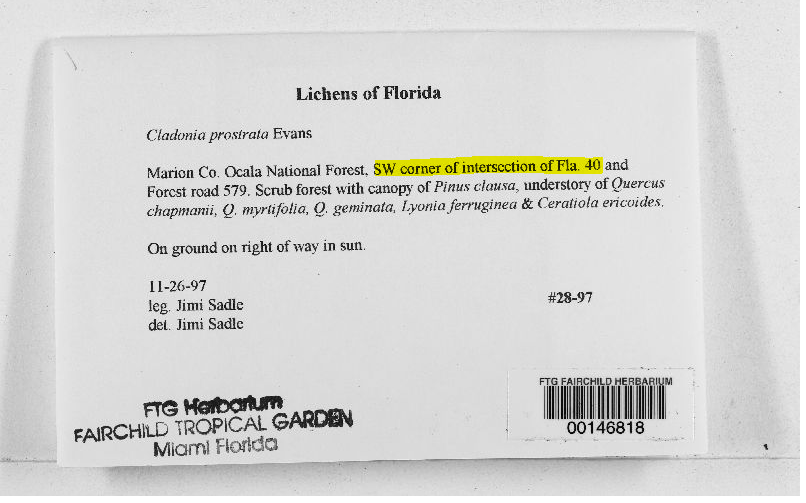
- Take this specimen for example. There is a misspelling in the locality field, we can infer that what is meant is “corner” but always check with the label as well. If the collector makes a very obvious misspelling on the label, such as “comer” for “corner,” then it is OK to enter the correct spelling in editor page. Be careful, especially with place names, when you assume that something is misspelled. E.g., “Salta” and “Salto” are two towns in Argentina. Salta is a city of 1/2 million, whereas Salto is a small town and relatively unknown.
- After making the edits, making sure there are now extra spaces and everything is transcribed accurately from the label into the record data, save your edits. The Save Edits button is located at the bottom of the screen.
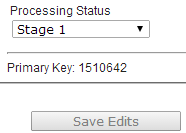
- You can also enter Section Township Range and verbatim coordinates if they are provided in the label data. Press the Tools option to open hidden fields for editing.
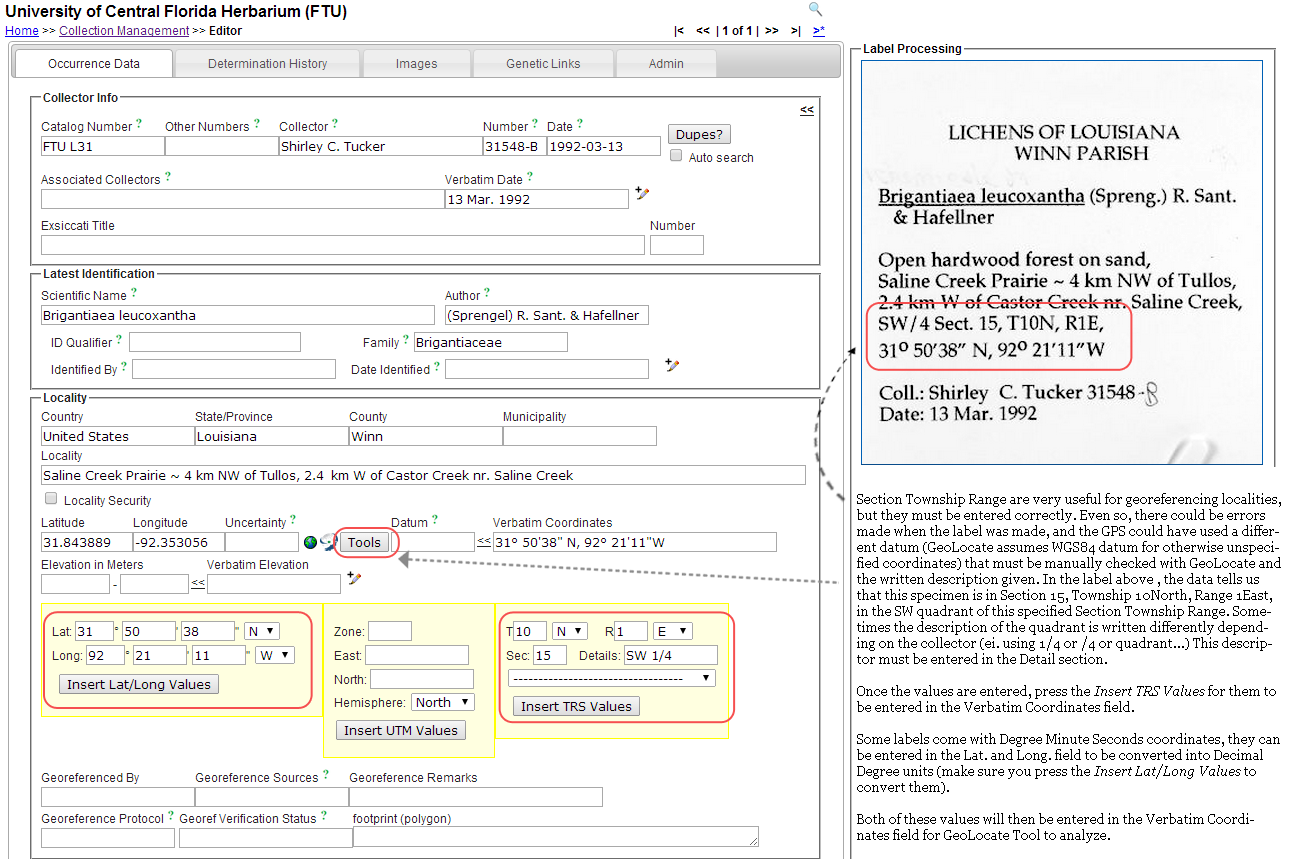
- After making sure that everything is entered correctly from the label data and the edits are saved, you can now start georeferencing using GeoLocate.
How to Use the GeoLocate Tool
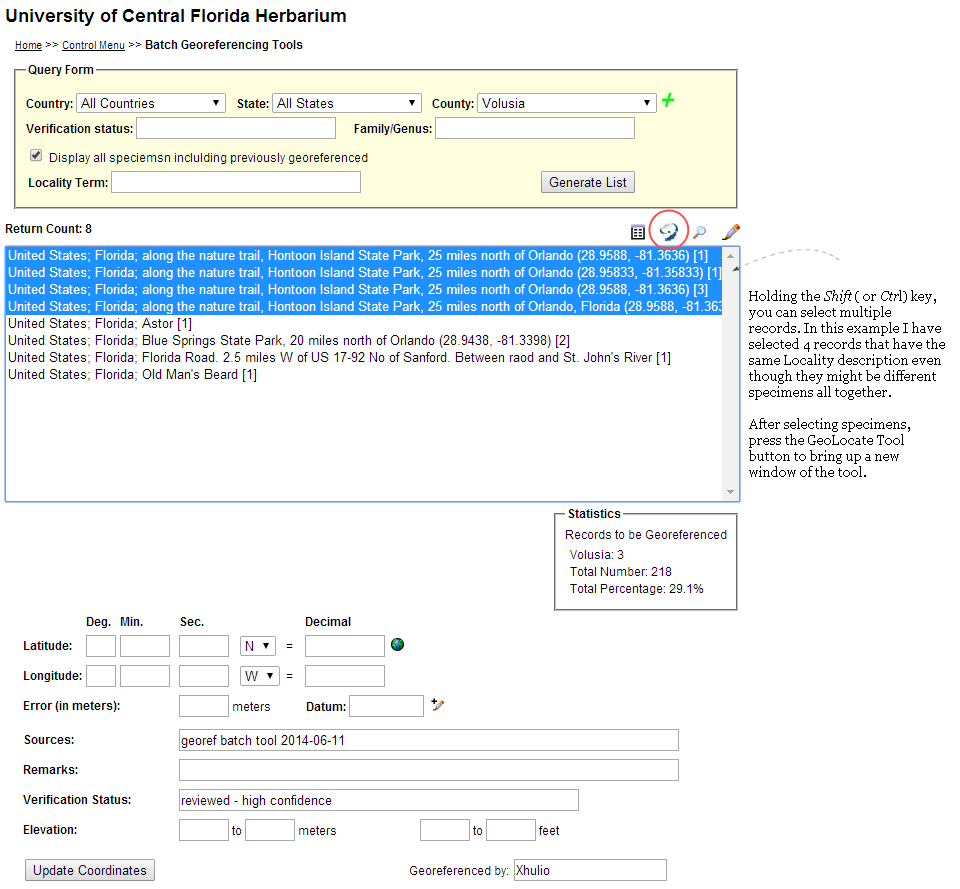
- Once all record data is entered correctly, the actual georeferencing process can begin. We can select multiple batches or sets of records that use the same locality description (even though though they might be different samples or species) to make the process quicker.
- While on the Batch Georeferencing Tools page, in the Return Count, highlight a set of specimens by clicking on it. You can select multiple records by holding the Ctrl or Shift button. Once highlighted, press the GeoLocate Tool button to open a new window of the GeoLocate tool.
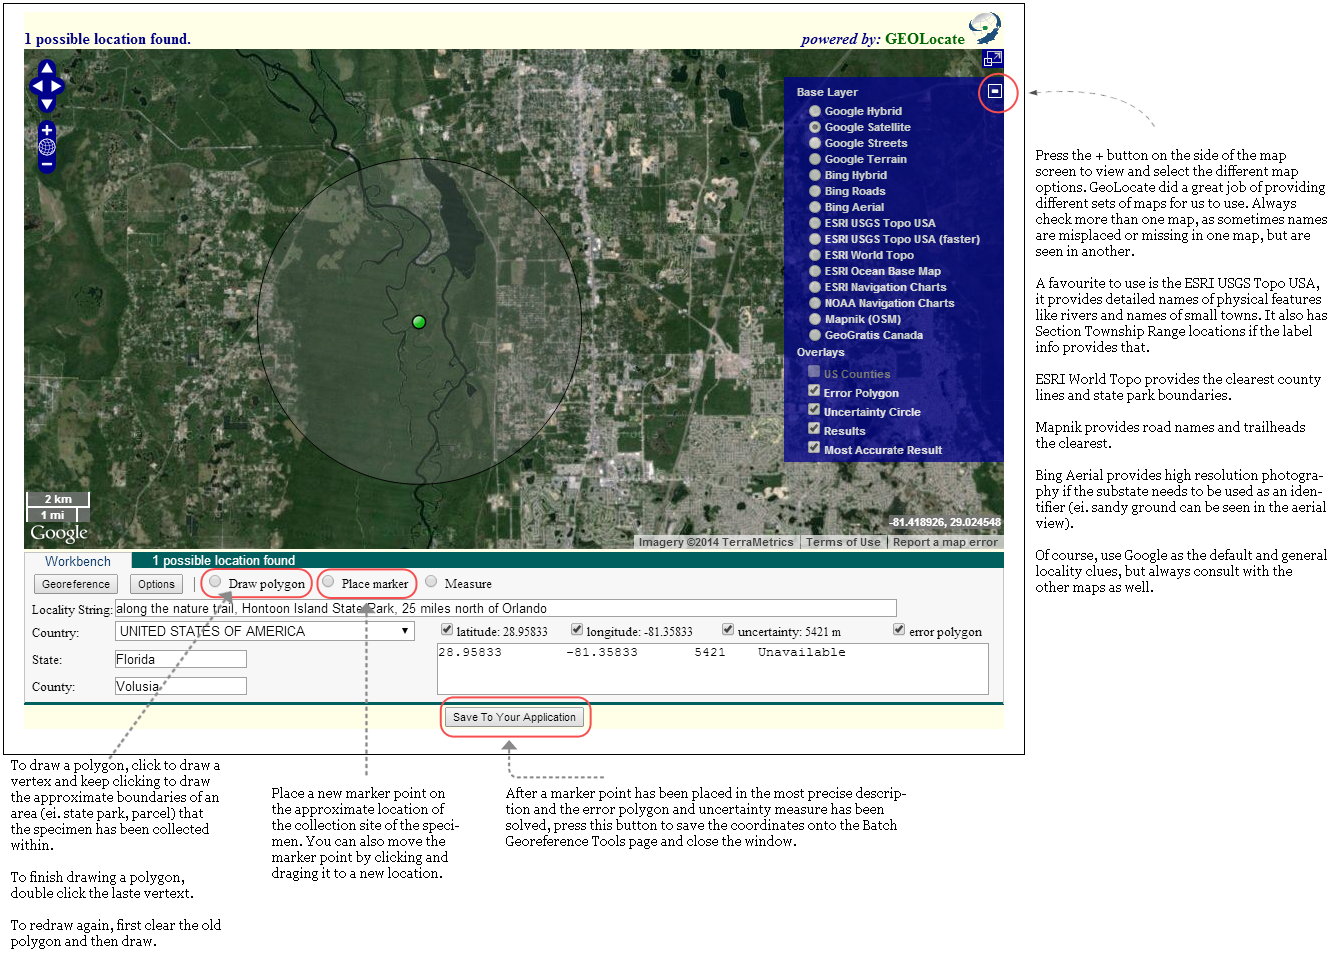
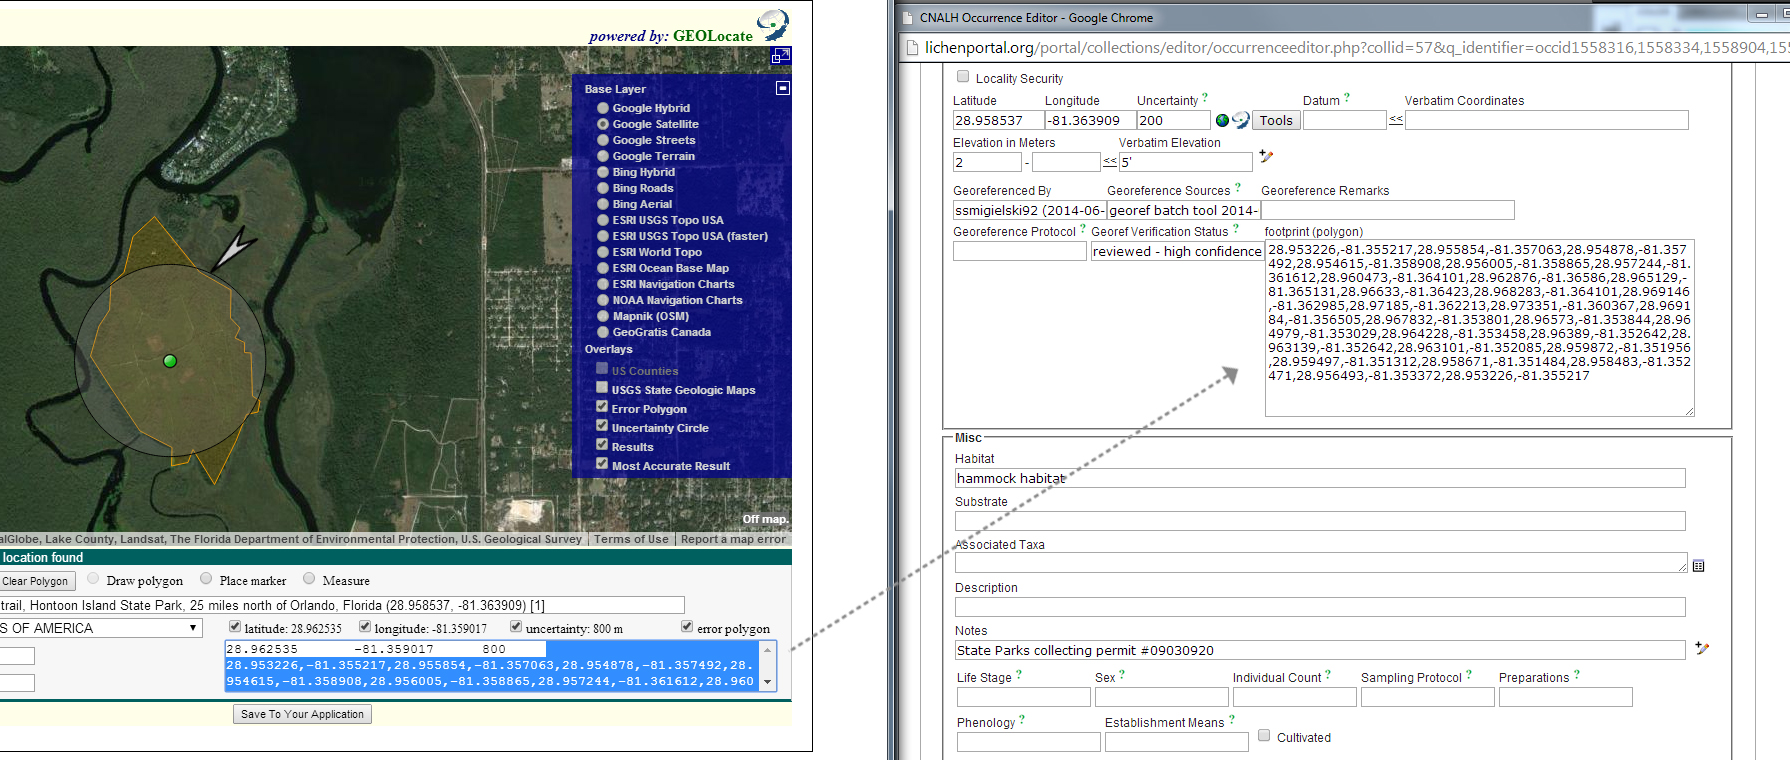
- In the new window of the GeoLocate tool, we will be using the different maps provided to confirm the locality given in the description. We will also be using the tool to place a marker on the approximate spot where the specimen was collected with an uncertainty radius and error polygon, if needed.
- To measure a distance, click the measure tool and then click the starting point on the map. Click again at a turn or double click to end the measure tool. Hold the Shift key to have a continuous line that can measure curves, like rivers or trails.

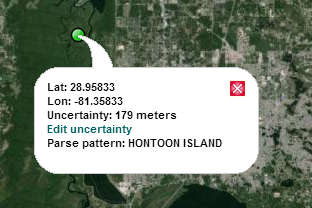
- The green dot is the current active marker point which is used for the location. To place a new active marker point simply click and drag an existing point to the desired location. You can also click the place marker button to place a new marker.
- To edit a marker’s uncertainty radius, click the point, and then Edit uncertainty. This will bring up a gray arrowhead that measures the distance of the uncertainty radius. Please use the guidelines below for an approximation.
Uncertainty Radius Guidelines:
- 800m or more – A big unspecified area, like Hontoon Island State Park, with no other identifiers able to be found, or only Section Township Range numbers with no identifiers.
- 400m – Specified area, park or preserve with identifiers unknown, like a specific trail head located in the park.
- 200m – Specified area, with specified identifiers located on maps.
- 100m – Coordinates measured with a GPS, specifically stated on label.
- 20m – Exact address found on a map, like a street address to someone’s lawn.
- If the uncertainty radius is unknown/undefined, or not needed, for example a locality that is only the County level specific, leave it blank (uncheck the uncertainty radius box) as the bounds of the County make up the uncertainty radius and error polygon.
- These guidelines may change, as some areas are bigger or smaller than others, for example it would not make sense to place a 800m uncertainty radius on a small park. That uncertainty is too big and no useful information would be given by it. Use your judgement and correct the the uncertainty radius to approximate the size of the locality.
Using Error Polygons
- Error polygons are sometimes useful in placing bounds to a specific locality that would be otherwise hard to know otherwise. Most of the time the uncertainty radius gives a good approximation of the locality, but the error polygon can make it more accurate.
- The error polygon coordinates (which are simply lat. and long. coordinates) will not be automatically saved with the lat. and long. coordinates, while the uncertainly radius will be saved. Therefore, to save the vertices of the error polygon copy all the coordinates in the footprint box in the GeoLocate Tool and paste them to the Occurrence Data Editor page in the footprint (polygon) box. Be sure to do this before the clicking Save to Your Application, because close the window and will wipe out the error polygon coordinates.
- Error polygons are sometimes not needed, as the some implied boundaries can be inferred and the error polygon would not provide as much useful information as it is worth doing. But if it is crucial in identifying a locality, for example locating a small pond with a large national park, go ahead and complete the polygon to your best abilities.
Transferring Data From the GeoLocate Tool to Batch Georeference Tools
- After saving the coordinate information from the GeoLocate Tool, they are transferred onto the Batch Georeference Tools page, which can be edited further.
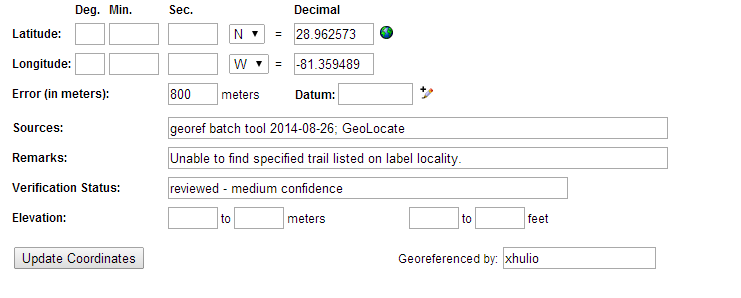
- In the Decimal field, the lat. and long. of the marker point you placed, along with uncertainty radius, in the Error field, is transferred over. You can also enter any other data known in the other fields like datum (if no datum specified, GeoLocate assumes WGS) and elevation if they were not properly entered during the label transcribing process.
- A very important field is the Remarks, where you can relay information about the specimen(s) to others, such as how you found the exact locality (please provide a link to the website with maps, etc…) or if you could not find it. The Remarks field is where you can make notes on the specimen or label data, for example, you can explain where there has been a name change in a region or that the label has a locality misspelled.
- The Verification Status similarly relays how accurate you feel about the georeferencing of the specimen. There are three levels, low, medium, and high, which are somewhat subjective. High confidence means that the locality data are accurate to the label data (which have no mistakes) and you are very confident in where the specimen has been georeferenced. Medium includes a few mistakes on the label or an unspecified location, like only a state park that is relatively small. Low confidence means that the locality cannot be specified and lies in this general region, like a town or county, or has many crucial mistakes on the label making the specimen hard to georeference. Confidence depends on scale, be sure that the two match. For example it would not make sense to have high confidence for a specimen that only states the county as a locality on the label, at this scale, it would be low confidence.
- The final step of the process is to click Update Coordinates. Make sure all information is entered and correct before doing so. Once Update Coordinates is clicked the specimen, or batch of specimens, you georeferenced disappears from the list, meaning that they have been georeferenced.
- To search for already georeferenced specimens to edit, refer to the top of this webpage, detailing how to query for already georeferenced specimens.
TIPS
- Use Ctrl and Shift to select multiple specimens.
- Use Ctrl and Shift to zoom in and out of images and maps.
- Use the Middle Click (clicking the scroll) on the mouse to pan over maps.
- Use Shift measure curves, roads, rivers. It is much more accurate.
- Use the different maps available, they offer different sets of information/ names at different scales. The ESRI Topo maps are a favorite for smaller scale localities.
- Always search Google for the localities given, sometimes names change, or even maps are provided which can prove useful.
- Always provide the links to any maps found or extra info on how you found a specific location in the Remarks field.
- Use what you know from other specimens already georeferenced, usually collector find specimens from around the same are or close by.