[This is the unabridged version of museum interns Andrea De Renzis and Justy Alicea’s April 2015 eNewsletter article.]
Traditional specimen-based research in paleontology sometimes requires destructive sampling in order to obtain measurements of features to identify specimens or understand ancient environments. Micro-CT scanning uses x-rays to create high-resolution virtual slices that, when layered together, form a three dimensional model that can be manipulated and measured. These digital models can also be shared with other researchers, educators, and the public, giving more people access to fragile, rare, or scientifically valuable fossils.
Recently, we traveled to Duke University to learn how the micro-CT scanner at the Shared Materials Instrumentation Facility (SMIF) works and to scan fossils collected from the Panama Canal. The main focus of our trip was to scan a set of 71 tiny rodent teeth. Before we left for Duke, we spent time preparing the specimens. They had to be removed from the pins on which they were mounted, and then packed into gelatin capsules. The packing process presented two challenges. First, we wanted to pack 8 teeth into each gel cap, but we had to make sure that none of the teeth were touching because this greatly hinders the post-processing stage later. Second, we had to make sure that each tooth could be re-associated with its label once the scanning was done and the teeth were unpacked. We developed a system using masking tape and cotton to layer the teeth inside the gel caps. We kept them grouped by locality, tried to pair different taxa in each layer, and kept very detailed notes about how we packed them. Once we had the rodent teeth ready to go, we also selected other important specimens including some fossil fruits and fossil crabs. These were pilot studies to see how well the scanner could handle the fossils of tissues other than bone or enamel.
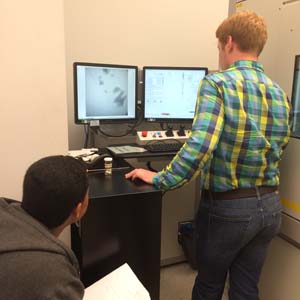
When we arrived at the SMIF lab, we met the resident technician, Jimmy Thostenson. He showed us how to set up the specimens inside the scanner. We were able to scan multiple gel caps at a time by stacking them in a tube, using foam to separate each one. Since we wanted the teeth to be scanned at a relatively high resolution, we could only program the scanner to scan half a gel cap at a time. Once the specimens were mounted Jimmy switched on the x-rays and we could view the live image on the computer. He then set the resolution and made adjustments to ensure that the image was not over-saturated. He resized and repositioned the image and set up the scanner to automatically adjust the center of rotation (which sometimes needs to be fixed after the scans are complete). He also set up automated reconstruction and chose settings that would reduce noise, mitigate the effects of beam hardening (which is an artifact that creates streaks on the image), and minimize ring artifacts (resulting in rings caused by any misalignment of the center of rotation). The SMIF lab has in-depth instructions on setting up the scanner available for free on their website (https://smif.lab.duke.edu/Description.asp?ID=88). The scanner both turns the specimen and lowers it in increments as fine as 5 micrometers. Later, as these scan slices are layered over one another, the internal and external anatomy of the object can be reconstructed in 3 dimensions. Although much of the scanning process is automated, there are some scans that will still need to be adjusted manually after. This happens sometimes when the scanner misaligns the center of rotation as the specimen turns during the scan. A separate program called CT pro 3 can be used to fix the center of rotation of the scans so that they line up correctly, avoiding the loss of time needed to rescan. These modified slices along with the “xtek” data file (generated by the scanner- in this case an xtek CT scanner) are all that’s needed to open a new project in Avizo to process the scans so that a 3d image can be compiled.
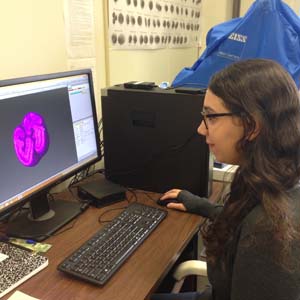
After we finished the scanning with Jimmy’s help, we began the post-processing to build the 3 dimensional model out of the files generated by the scanner. We have already had some practice with this. Before our trip to Duke, we processed the data for horse teeth, shark teeth, and the bones of both anaconda and Titanaboa (http://www.sites.si.edu/titanoboa/index.htm). Using Avizo, we compile the x-ray slices and then select the specimen to separate it from the surrounding packing material. This is a challenging part of the process because it is important to select the right amount of threshold to accurately capture the surface. Too high a threshold and more than the bone is selected, giving the specimen the look of containing matrix. That is actually a quite apt term for it- digital matrix. Too little threshold and you can lose significant parts of the specimen, resulting in pitted inaccurate surfaces. While this may itself be intuitive, it can lead to some interesting problems in reconstructing a specimen, the most challenging of which so far is a bleeding effect that occurs when two specimens are touching. There are supposed to be ways around this (i.e. limit lines and 3d lasso-ing), but we haven’t found one that works the way it theoretically should. The computer/program does not know the boundaries of what you are selecting, so if a specimen of the same density is touching the one you are trying to select, it will show in the scan as the same gradient and selected together. Teasing these elements apart can be frustrating and painstakingly time consuming. Thoughtful planning of the scanning being done beforehand is the best way to avoid kicking yourself later over such a solvable problem. This is key.
The shark teeth, horse teeth, and snake bones have already been archived online at MorphoSource (http://morphosource.org/) and have already been used as parts of lessons in k-12 classrooms through the GABI-RET program, which you can find out more about here http://gabiret.com/about-2/. Our 3D images have even been 3D printed already for use in classrooms as well. Seeing how our processing work has been put to use has made it all the more rewarding and we hope to continue using micro-CT scans to not only help scientists collect valuable data, but also to help teachers incorporate paleontology/earth science into their classrooms.
We are still processing all the data from the rodent teeth, as well as the crabs and fruits. Once these are done they will be used in ongoing research projects and eventually used in lesson plans. It may sound like a highly technical process, but the procedure is straight forward once you know what you are looking for. Great resources for further information on specific steps can be found at UT Austin and Duke University’s digital imaging websites (http://www.ctlab.geo.utexas.edu/overview/index.php, https://smif.lab.duke.edu/Description.asp?ID=88).